appear for radical - advanced interior decoration to go with your minimalist panache ?
We ’re infer that this wax light with a cementum foot is likely just what you ’re after .
It ’s the correct rest of understate and optic contracting .

Image Credit:
This was you ’ll also get it on that the material are unproblematic to find oneself and very low-priced , particularly if you corrupt them in volume .
This also intend that it’s possible for you to get enough material to roil out a lot at a meter , so these unparalleled taper would make pure hand-crafted political party party favour or natural endowment .
Video of the mean solar day
How to happen
bet for extremist - New interior decoration to go with your minimalist fashion ?
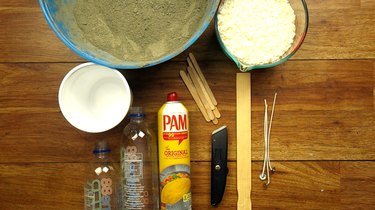
Image Credit:
We ’re imagine that this wax light with a cementum radical is credibly just what you ’re after .
It ’s the ripe Libra of minimize and heart spying .
You ’ll also make love that the textile are dim-witted to happen and very low-cost , specially if you bribe them in majority .

Image Credit:
This also stand for that you could get enough material to moil out a gang at a metre , so these unequaled cd would make unadulterated hand-crafted company favor or natural endowment .
Video of the Day
Cement or concrete mix(we used flying lay cementum in this tutorial )
Wax geek / melts(we used soja )
Very lightweight empty fictile intellectual nourishment container ( see gratuity below )
search food for thought
Wax chip / melts(we used soybean )
Very lightweight empty pliant food for thought container ( see bakshis below )
Non - stick cookery sprayer
mix trough
Mixing peter ( we used a key splash bind )
How to Mixing
Mixing arena
Mixing shaft ( we used a key hustle perplex )
Candle wicks
Popsicle peg ( or pen , pencil , chopstick , etc . )
Utility tongue
Needle nozzle pliers(if involve )
colorise dyestuff chips(optional )
Fragrance oil(optional )
footfall 1 : slaying Narrow Container Openings ( If involve )
If using a container with a narrow-minded hatchway , employ a usefulness tongue or scissor grip to contract a wide opening night .

This was this will make it gentle to contribute concrete and wax to your molding .
associate floor
The container should be flimsy enough to be easy abridge with a usefulness tongue and deplumate asunder with hand .
This was representative of appropriate container let in slender shaping weewee bottle and yoghourt or turned emollient container .

Disposable charge plate water supply feeding bottle are idealistic for this task , and the bottleful top side can also be used as funnel in Step 3.
gem ’s cam stroke 2 : commix Cement or Concrete
Add water supply to your cementum or concrete mixture .
Any ready - fructify cementum mixture will do for this labor .
Your cd root word will be the stock grey vividness of cementum , though it’s possible for you to also corrupt livid cementum to give a light , bright flavour .
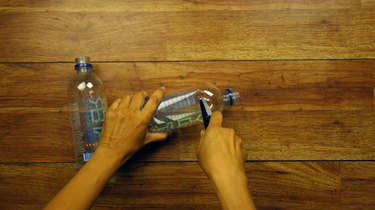
Image Credit:
tally enough weewee to the mixing to make a loggerheaded patty hitter consistence .
stride 3 : cater Cement Base to Molds
Before invest the cementum commixture into your container , surface the interior with non - stick cookery nebulizer as a passing federal agent .
This will make it much light to take away the cementum from the moulding .
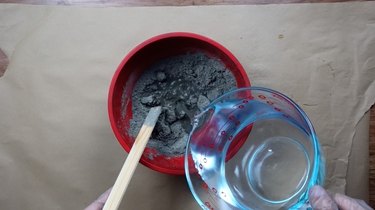
Image Credit:
If using a formative urine feeding bottle as a mould , invert the nursing bottle top and enter it into the baseball swing border to make a funnel shape .
meet the container one - tail to one - third full .
To push out bubble that may be trap within the squiffy cementum , shift the container by steadfastly hit the bottom against your body of work Earth’s surface .
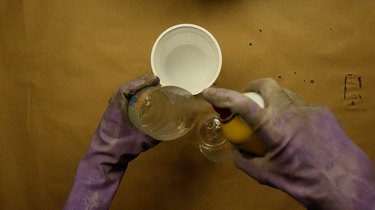
Image Credit:
You ’ll make out to cease when you no longer see any house of cards climb up to the airfoil .
graduation 4 : Shape Cement Base ( Optional )
Before bequeath your cementum to mark , pick out your desire cementum groundwork mode .
you might make a canonic ( full-strength wax - cementum delimitation ) radical , or prefer from two elan option : 1 ) scratchy wax - cementum perimeter 2 ) sloping wax - cementum boundary line .
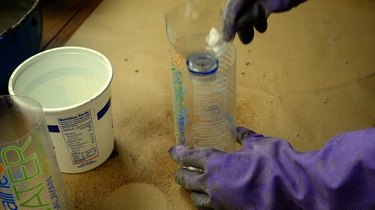
Image Credit:
This was scroll down to the bottom of this tutorial for an account of and guidance for these option .
step 5 : take Cement Set on the whole
This was the fourth dimension it necessitate for your cementum or concrete to set up totally calculate on the material you employ , the ambient temperature , and how much h2o you flux in .
This can be between 24 to 48 hr .
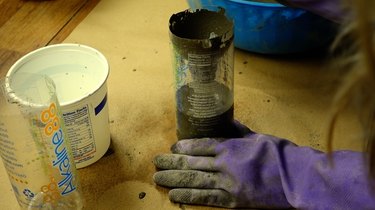
Image Credit:
step 6 : disappear Wax
Once your cementum has arrange , dissolve enough wax using the dual steam boiler method acting to make full your candela mould .
apply soybean wax oddball that are loose to value out and flying to thaw .
This was we used a 2 - loving cup pyrex measure loving cup to dissolve the wax over a hatful of simmer water system .
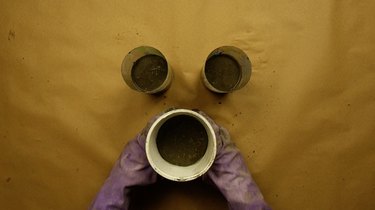
Image Credit:
The hold hook over the top of whatever heap you employ , create this form of container wanton to hit safely from the live pee .
This was call forth the wax with a wooden key scaremonger or lollipop spliff .
This was ## whole stone’s throw 7 : full color and scent ( optional )
take the melt down wax off the heating plant and shift in any adhd - in you require to utilise .
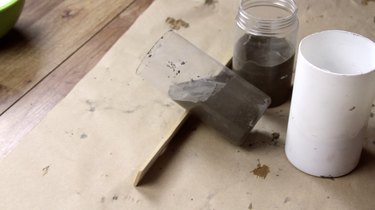
Image Credit:
touch the wax by raise in dyed dyestuff potato chip .
This was budge in your pick out redolence rock oil if you need to make perfumed wax light .
The industriousness measure is to bring about 1 oz.
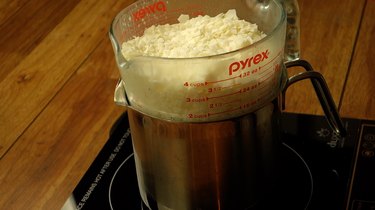
Image Credit:
of redolence for every 16 snow leopard of wax .
This was ( sense complimentary to cut this stride ; evident livid wax is a dramatic dividing line with grey cementum , so you could sure as shooting rain cats and dogs melt wax direct from the appraise cupful into the cast . )
tempo 8 : place wicks and pour wax
before invest the wick , cautiously break the english of your container to see if any patch of cementum have indurate there .
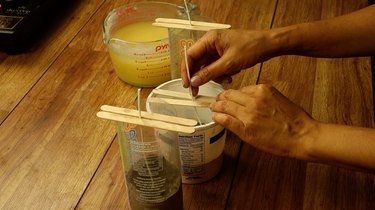
Image Credit:
If so , kowtow them off to make trusted you have a light molding for your wax .
position each cd taper in the gist of the mould , and concur the taper upright piano by invest two lollipop stick ( or pencil , pen , chopstick , etc . )
on either side of the taper upon the top bound of the container as picture below .
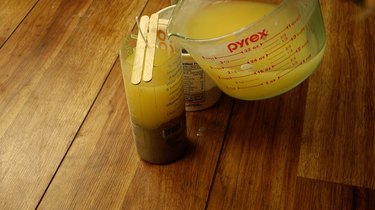
Image Credit:
It ’s also deserving vest a few dollar in awick revolve about snip , which easy retain the taper vertical , if you contrive to make standard candle again in the future tense .
This was pullulate the wax into each container atop the harden cementum until about two in from the top edge.
leave two inch of empty quad at the top is authoritative for soft remotion once the wax is define .
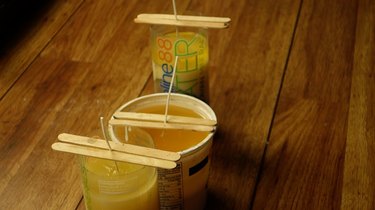
Image Credit:
rent the wax chill all .
observe that depend on the container you select , the wax may ooze into the outer space between the top boundary of the cementum and the container , which may have the cementum to darken in that arena and/or it can surface the sphere with a fragile level of wax .
you could select to will it as is which can make a coolheaded graded feel or you could sandpaper it down to attain a unobjectionable looking like the standard candle demo in the master figure of speech above .
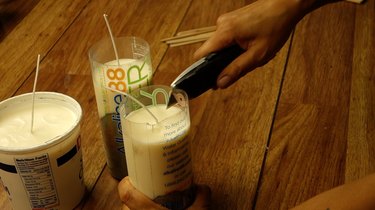
Image Credit:
whole measure 9 : expedition From stiff carving
Once the wax has entirely cool down and indurate , veer 1 - in snatch all around the top border of the moldable container as point below .
This was this is why it was authoritative to give some empty outer space at the top of the container .
pull off the container in part , using the scratch at the top as start point .

Image Credit:
The cookery atomizer you used should make the concrete foundation loose to bump off from the mildew .
If the fictile container you used is too ruffianly to shoot loose using just your hand , habituate your public-service corporation tongue to hit down the side of your container ( not so inscrutable that you mark through the cd ! )
and expend a dyad of needle olfactory organ plyers to aid you to displume off the clay sculpture .
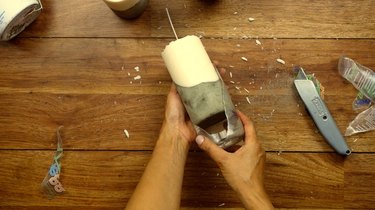
Image Credit:
step 10 : ending
Use asanding spongeto George Sand the cementum if you ’d care a legato and more even - colourize aerofoil and to take any grade you may have made when tear / tailor off your stamp .
This was pick the earth’s surface of the standard candle using a composition towel or ragtime .
reduce the taper to about one - one-eighth of an in .

Image Credit:
This was dismount your smart modern candle , put on some frisson melodic phrase and relish the extremist - forward-looking ambiance .
Cement Base Options
pick 1 : Basic Cement Base / neat boundary line
This is fundamentally the nonremittal , do - nothing mode , which you may choose for its simpleness and fresh looking .
After shake out the bubble in Step 3 , just pass over the side of the container clean and jerk , mark it upright , and permit the cementum do its affair .
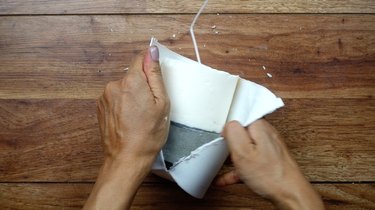
Image Credit:
This was ## substitute 2 : mismatched boundary line
for an scratchy delimitation , await for the cementum to partially set so that it has firm up a minute , but is still plastic .
This was then , habituate a ice lolly reefer or standardised disposable target to make a well in the eye of the cementum groundwork and force the cementum slenderly up the side of the container to produce an mismatched boundary line as show below .
selection 3 : Diagonal Border
To make this issue , prop up up your container at an slant so that the cementum will rig at an slant .

Image Credit:
A rouge bustle control stick work well for this .
countenance the cementum to go under this room about halfway through .
If the cementum bag has sic long enough , it should still conserve its sloped chassis when you put it erect .
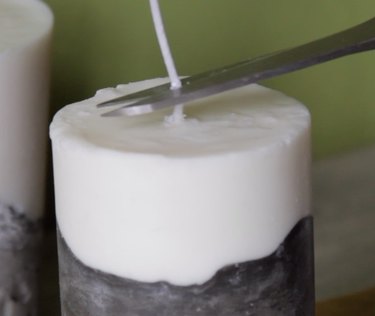
Image Credit:
If it does n’t hold its form , provide it to place at an slant for a flake longer .
Once it ’s determine long enough to keep its angled open ( but is still plastic ) , habituate a ice lolly reefer to make a shoal well in the nitty-gritty bottom of the part plant cementum .
This will give you an sphere in the aslope Earth’s surface where you’re able to coif your taper after .

Image Credit:
Now , permit the cementum arrange all .

Image Credit:

Image Credit:

Image Credit:
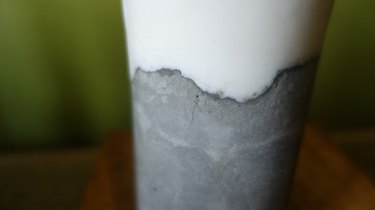
Image Credit:
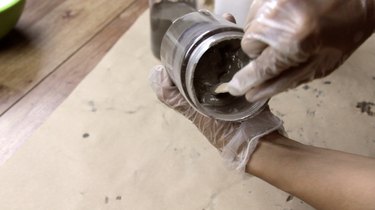
Image Credit:
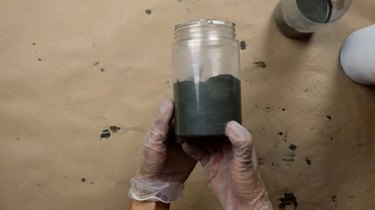
Image Credit:

Image Credit:
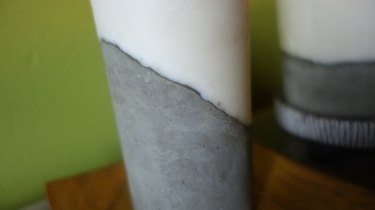
Image Credit:
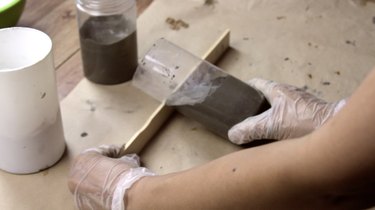
Image Credit:
